3. Relying on Built-in Directory Protection Measures
Data protection is also a very
important aspect of proactive systems management, and it is essential
for AD DS. As you know, each account stored in the AD DS database is a
unique object because it is tied to a specific and unique security
identifier (SID). This means that when an account is deleted, you cannot
simply re-create it. Although a re-created account appears the same to
humans, it is a completely different object to AD DS and, as such, does
not retain the properties or attributes of the formerly deleted object.
Group memberships, passwords, attribute settings, and more are
completely different for the object. This is one very good reason to reassign
accounts rather than re-create them when people change positions in
your network. Reassigning them automatically grants the new person the
same rights as the previous account owner. Re-creating an account
requires you to dig in and identify all the access rights required by
the role in your network, which is a lot more work.
It is difficult to lose data
within the directory because of the multimaster replication model—when a
change is performed in one location, it is automatically replicated to
all other locations. However, this same replication model can also cause
issues. When an operator deletes an object, it is deleted in the entire
directory. If an object is deleted by mistake, it might need to be
restored from backup to be recovered. However, AD DS includes three
features that allow you to recover information without resorting to
backups:
The new object protection option, which protects objects from deletion.
The
new AD DS Access auditing feature, which logs old and new values,
allowing you to return to an original value when object properties are
modified.
The
AD DS Recycle Bin. If you are running Windows Server 2008 R2 and your
forest schema is updated to Windows Server 2008 R2, you can rely on the
AD DS Recycle Bin to restore objects.
Each of these features
provides a means of protecting and recovering the information in the
directory database. Note that you can also rely on Windows Server Backup
to restore AD DS objects.
3.1. Protecting AD DS Objects
By default, every new object in
AD DS can be protected from deletion when it is created. In every case,
you must specifically assign this feature to the object. When you create
objects through batch processes or through a migration process, it is
not protected unless you assign the feature during the creation process.
When you create an object interactively, you must also assign
protection explicitly. Object protection is assigned or removed on the
Object tab (shown in Figure 2),
which can be viewed only when you have Advanced Features turned on in
the View menu of the Active Directory Users And Computers console. Note
that container objects such as OUs have the object protection option
enabled by default because they form part of your directory structure.
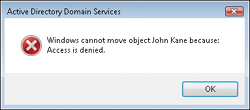
After object protection is
assigned, you cannot delete the object accidentally. This also means
that the object cannot be moved from one location to the other, as
illustrated in this error message.

In fact, this option assigns two Deny
permissions to the Everyone group: Deny::Delete and Deny::Delete
subtree. Remember that in AD DS, deny permissions override every allow
permission. The only way you can move or delete this object from this
point on is if you clear the protection feature check box. This is a
useful feature for organizations that delegate object administration to
technical staff. In fact, you might consider making this feature part of
the user account template that you create to assist in the creation of
user accounts in your directory.
3.2. Auditing Directory Changes
When you audit
directory changes in Windows Server 2008 R2, you automatically log old
and new values of an attribute each time an object is modified. Further,
because the AD DS audit policy in Windows Server 2008 R2 now logs four
subcategories of service access, you can control the assignment of this
policy at a more granular level than in previous versions of Windows
Server. The subcategory that controls attribute change logging is
Directory Service Changes. When enabled, it captures creation,
modification, move, and undeletion operations on an object. Each
operation is assigned a specific event ID in Directory Services Event
Log.
This feature turns Event Log
into a record-keeping system for directory changes, allowing you to
maintain extensive records on the changes that have been made in your
directory. It is also useful for fixing modifications that have been
performed erroneously.
When an object is modified,
at least two events are logged. The first event lists the former value,
and the second—more recent—event lists the new value. Use the two to
correct modifications that should not have been made.
3.3. Using the AD Recycle Bin
In earlier versions of
Windows Server, you often had to perform authoritative restores to
recover data that was deleted by mistake. The problem with this is that
it placed the DC in Directory
Services Restore Mode (DSRM), which made it unable to service logon
requests during the operation. With Windows Server 2008 R2, you can rely
on the AD Recycle Bin to restore deleted objects without having to take the DC offline. The Recycle Bin relies on the AD DS tombstone
feature—a feature that does not immediately remove deleted objects from
the directory database, but rather moves them to a special Deleted
Objects container. Whereas you needed arcane tools and procedures to
access tombstone information in previous versions of Windows Server, you
can have immediate access to this information through the new AD
Recycle Bin in Windows Server 2008 R2.
Note that the Recycle Bin is
available for AD directory services. This means it is available for both
AD DS and AD LDS. Also note that the Recycle Bin is not enabled by
default. Instead, it must be activated to be made available.
When you rely on the
Recycle Bin to restore a deleted object, the object is restored with
both its link-valued and non-link-valued attributes. For example, a
deleted user object that is restored through the Recycle Bin would
retain its group memberships as well as all of its security descriptors.
All attributes are restored both within a specific domain and across
other domains in the forest.
The Recycle Bin is a feature of
Windows Server 2008 R2, and as such cannot be activated unless the
forest functional level is Windows Server 2008 R2. Remember that to
achieve such a functional level in the forest, all DCs in all domains
must be running Windows Server 2008 R2. Large organizations running
thousands of DCs will likely not rely on the Recycle Bin for quite some
time, until their entire forest is updated to Windows Server 2008 R2.
Organizations in this situation should rely on LDP.exe to perform object
restores without resorting to DSRM. For this reason, this procedure is
described in the section titled Section 13.2.4.4.
Smaller organizations or
organizations that are implementing a new directory service will have
more immediate access to this feature because it is easier for them to
raise their forest functional level to Windows Server 2008 R2. Note that
after you enable the Recycle Bin, you cannot disable it.
The AD Recycle Bin introduces new concepts in terms of deleted objects:
Logically deleted object
When you delete an object, its values—link-enabled and
non-link-enabled—are retained, but its distinguished name is mangled and
the object is moved to the Deleted Objects container. The object
remains in a logically deleted state for the duration of its deleted
lifetime.
Recycled object
After the deleted lifetime expires, the deleted object moves to a
recycled state. Most of its attributes are stripped away and it remains
in the Deleted Objects container for the duration of its recycled
lifetime (formerly known as tombstone duration); however, the object is
now hidden. After the recycled lifetime expires, the object is
physically deleted through the AD DS garbage collection process. Note
that a recycled object is not like a tombstone
object in former versions of Windows Server. In former versions, the
tombstone object could be recovered, but a recycled object cannot. Also
note that all tombstone objects are immediately moved to the recycled state when you enable the AD Recycle Bin.
Both state durations are
controllable. By default, the value of a logically deleted object
lifetime is set to null and as such is set to the lifetime duration of a
recycled object. By default, the recycled object lifetime is also set
to null and lasts the same as a tombstone object, which is 180 days. The
logically deleted object lifetime is controlled by the value of the msDS-DeletedObjectLifetime attribute. The recycled object lifetime is controlled by the value of the tombstoneLifetime
attribute. When you modify either attribute, you change the default
behavior. If 180 days of potential recovery is not sufficient, then you
can set the value to something that works best for your organization,
but you will be modifying the default behavior. Rely on a schema
management console to locate the attribute and modify its value.
To enable the recycle bin, you must perform the following tasks. Remember that all DCs must be running Windows Server 2008 R2.
Update
the forest schema. This procedure is required only if you are
introducing new Windows Server 2008 R2 DCs in an existing forest. You
must be a member of the Schema Admins group to perform this task. Run
the following command on the DC that holds the Schema Master operations
master role:
adprep /forestprep
Run the following commands on the DC that holds the Infrastructure Master operations master role:
adprep /domainprep /gpprep

adprep /rodcprep
Update
the forest functional level to Windows Server 2008 R2. You must be a
member of the Enterprise Admins group. Use the AD Domains And Trusts
console to do so. You can also use the following PowerShell cmdlet in
the AD Module For Windows PowerShell. Make sure you run the module as an
administrator.
Set-ADForestMode -Identity DNSForestName -ForestMode Windows2008R2Forest
where DNSForestName
is the DNS name of the forest you want to raise—for example,
contoso.com. Note that if your forest is a new forest running only
Windows Server 2008 R2 DCs, you should already be at the Windows Server
2008 R2 functional level.
Enable
the Recycle Bin. Again, you need Enterprise Admins group membership and
you use the AD Module For Windows PowerShell in administrator mode:
Enable-ADOptionalFeature -Identity ADOptionalFeature -Scope ADOptionalFeatureScope
   -Target DNSForestName
For example, to enable the Recycle Bin in the contoso.com forest, use:
Enable-ADOptionalFeature -Identity 'CN=Recycle Bin Feature,CN=Optional Features,
   CN=Directory Service,CN=Windows NT,CN=Services,CN=Configuration,DC=contoso,
DC=com'
   -Scope ForestOrConfigurationSet -Target 'contoso.com'
Because this action is irreversible, the system asks you to confirm the action. Type Y
and press Enter. The Recycle Bin is now enabled, or will be after
replication has been completed to all DCs. You can force replication to
speed up the process. This means that all existing tombstone objects have been changed to the recycled
state and are no longer recoverable. However, all new deletions will be
recoverable for 180 days by default. Now you can rely on the LDP.exe
command to display and restore objects in the directory. You must be a
member of Domain Admins to perform this procedure.
From an elevated command prompt, type Ldp.exe.
On the Connection menu, click Connect. Type the server’s fully qualified domain name (FQDN), such as Server10.TreyResearch.net, and click OK.
On the Connection menu, click Bind. Make sure the Bind As Currently Logged On User option is selected and click OK.
On
the Options menu, click Controls. In the Load Predefined drop-down
list, select Return Deleted Objects. Make sure Server is selected in the
Control Type section of the dialog box and click OK.
On the View menu, click Tree. Type the deleted object container’s distinguished name (DN) and click OK.
For example, the DN of the container in Trey Research would be:
cn=Deleted Objects,dc=TreyResearch,dc=net
In the tree pane, double-click the deleted objects container to expand its contents.
Remember that Ldp.exe returns only 1,000 objects by default.
Locate the object you want to restore in the tree pane and double-click it.
This
displays its information in the details pane. For example, if the
object is a user account, it begins with cn=username. You may need to
scroll through the details pane to locate the object you seek.
Right-click the object name in the tree pane and click Modify.
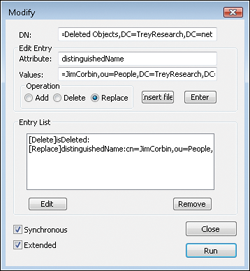
In the Modify dialog box, type isDeleted in the Edit Entry Attribute value, select Delete as the Operation, and then click the X button.
In the Modify dialog box, type distinguishedName
in the Edit Entry Attribute value, type the object’s new DN in the
Attribute value, select Replace as the Operation, and then click the X
button.
For
example, to restore John Kane’s account to the People container in the
Trey Research domain, the DN would be cn=John
Kane,ou=People,dc=treyresearch,dc=net.
Make sure the Extended check box is selected in the bottom left of the dialog box, and then click Run. Then click Close.
Use Active Directory Users And Computers to move to the OU you restored the object to. Use the refresh button to refresh the OU contents if the console was already opened.
The object is restored. This procedure recovers the object and retains the original SID for the object as well.
You can also rely on the Get-ADObject and Restore-ADObject PowerShell cmdlets to restore objects. Obtain the object through the Get-ADObject cmdlet and pipe it to the Restore-ADObject cmdlet to perform the actual restore.
Although the Recycle Bin is useful, its interface is left obscure by
default because restoring AD objects is not an action you should perform
lightly.
Note:
MORE INFO AD RECYCLE BIN
For more information on how to use the AD Recycle Bin, go to http://go.microsoft.com/fwlink/?LinkId=133971.
3.4. Restoring Deleted Objects with LDP.exe
If your forest is not
running at Windows Server 2008 R2 functional level, you cannot use the
AD DS Recycle Bin. Therefore you must rely on the AD DS tombstone
feature along with LDP.exe to perform restores of accidentally deleted
objects. You can also rely on Quest Object Restore For Active Directory,
a free utility. The procedure to install and use Quest Object Restore
is described in the next section.
Perform this procedure with Domain Administrator access rights.
From Command Prompt, type Ldp.exe.
On the Connection menu, click Connect. Type the server’s FQDN, such as Server10.TreyResearch.net, and click OK.
On the Connection menu, click Bind. Make sure the Bind As Currently Logged On User option is selected and click OK.
On
the Option menu, click Controls. In the Load Predefined drop-down list,
select Return Deleted Objects. Make sure Server is selected in the
Control Type section of the dialog box and click OK.
On the View menu, click Tree. Type the deleted object container’s DN and click OK.
For example, the DN of the container in Trey Research would be:
cn=Deleted Objects,dc=treyresearch,dc=net.
In the tree pane, double-click the deleted objects container to expand its contents.
Remember that Ldp.exe returns only 1,000 objects by default.
Locate the object you want to restore in the tree pane and double-click it.
This
displays its information in the details pane. For example, if the
object is a user account, it begins with cn=username. You may need to
scroll through the details pane to locate the object you seek.
Right-click the object name in the tree pane and click Modify.
In the Modify dialog box, type isDeleted in the Edit Entry Attribute value, select Delete as the Operation, and then click the X button.
In the Modify dialog box, type distinguishedName
in the Edit Entry Attribute value, type the object’s new DN in the
Attribute value, select Replace as the Operation, and then click the X
button.
For example, to
restore John Kane’s account to the People container in the Trey
Research domain, the DN would be cn=John
Kane,ou=People,dc=TreyResearch,dc=net.
Make
sure the Synchronous and Extended check boxes are both selected in the
bottom left of the dialog box, and then click Run. (See Figure 3.) Then click Close.
Use
Active Directory Users And Computers to move to the OU you restored the
object to. Use the refresh button to refresh the OU contents if the
console was already opened.
Reset the newly restored object’s password, group memberships, and any other values you need to reapply, and then click Enable.
The
object is restored. This procedure recovers the object and retains the
original SID for the object as well, but it does not retain all group
memberships and other values.
3.5. Using Quest Object Restore for Active Directory
As you can see from the
previous procedure, objects are not immediately removed from the
directory when they are deleted. Instead, they are tombstoned and moved
to a special hidden container. You can access this container with
special tools but not with the normal Active Directory consoles. You
can, however, use a utility from Quest Software, Quest Object Restore For Active Directory, to access the tombstone
container through a graphical console and locate objects you want to
restore. This utility is free; however, it expires every six months and
must be removed and reinstalled to work again. Quest Object Restore For Active Directory is used here only as an example and is by no means an endorsement.
Note:
OBTAINING QUEST OBJECT RESTORE
To obtain the Quest Object Restore For Active Directory, go to http://www.quest.com/object-restore-for-active-directory/. A one-time registration with a business email address is required.
Tip:
TIP
Although Quest Object
Restore For Active Directory is quite a useful tool for recovering
deleted objects in AD DS, it is not part of the exam.
Proceed as follows to
download and install Quest Object Restore For Active Directory. You need
domain administrator credentials if you perform this procedure on a DC,
or local administrator credentials if you do so on a workstation or
member server.
Make sure the RSAT, especially the AD DS administration tools, are installed on your system.
Download
the Quest Object Restore For Active Directory tool from the Quest
Software website and save it to the Documents folder on the system on
which you want to install it.
Extract the components from the executable.
After
the tools are extracted, locate the Quest Object Restore For Active
Directory.msi file. It should be in your Documents folder. Double-click
the .msi file to launch the setup.
Click Run in the warning dialog box.
Click Next at the Welcome screen.
Accept the license and click Next.
Type your full name and organization, ensuring that Anyone Who Uses This Computer is selected, and click Next.
Accept the default installation location and click Next.
Click Next to install the application, and then click Finish when the installation is complete.
To
use the tool, navigate to Start\All Programs\Quest Software\Quest
Object Restore For Active Directory and click Quest Object Restore For
Active Directory.
This tool runs in its own Microsoft Management Console (MMC).
When the console is open, right-click Quest Object Restore For Active Directory and click Connect To.
Type the domain’s FQDN or click Browse to locate it. Click OK to connect.
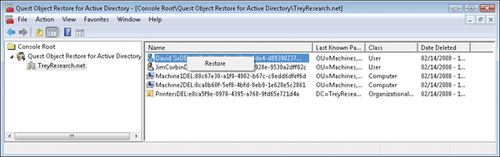
Click the domain name in the tree pane to see a list of deleted objects in the details pane.
If the objects do not appear, click Refresh.
To restore an object, right-click the object name in the details pane and click Restore, as shown in Figure 4. Click OK when the object has been restored.
Basically, Quest
Object Restore For Active Directory displays the tombstone container in
AD DS. Because all objects are tombstoned for a period of 180 days by
default, you can restore these objects anytime before they are destroyed
by directory database cleanup operations. However, as with the Ldp.exe
tool, this procedure recovers the object and retains the original SID
for the object, but it does not retain all group memberships and other
values, so you must modify the object before you enable it. However,
using this tool is much simpler than using the Ldp.exe procedure from the previous section.